Post by mwardncsu on Jul 15, 2012 17:17:35 GMT -5
UPDATE - Photobucket has changed their terms where you can no longer link to photos stored there with the free account - you have to have a paid account now..... going to have to look at other options for picture hosting....
Pics are welcome - the more the better...... pics make a board more interesting and help us all feel like we are there with you.
If possible, save your pics in something like 640x480 or maybe just a little larger - this makes the pics load quicker for everyone, and saves your bandwidth and storage quota on Photobucket or wherever.
(I found the other place where I had posted this tutorial, so here it is , I need to update & replace some screen shots, so stay-tuned.
Photobucket ( www.photobucket.com ) is a free photo-sharing web-site where you can upload and store your photos on their Web-site and then link to those photos in forums such as smlfishingforums.proboards.com. In addition to providing basic photo storage, you can do some photo editing such as cropping and resizing your images as well as other editing options (swirles, applying color filters, etc).
This tutorial was written from the perspective of using a Mac and the Safari Web-browser, but the procedure should look and be very similar if not exactly the same when working from a PC using Internet Explorer or another PC-based browser.
You start the fun by going to the Photobucket web-site ( www.photobucket.com ).
Creating a Photobucket account
If you do not already have an account on Photobucket, then you need one - click on "Sign up" in the upper right corner of the browser window.
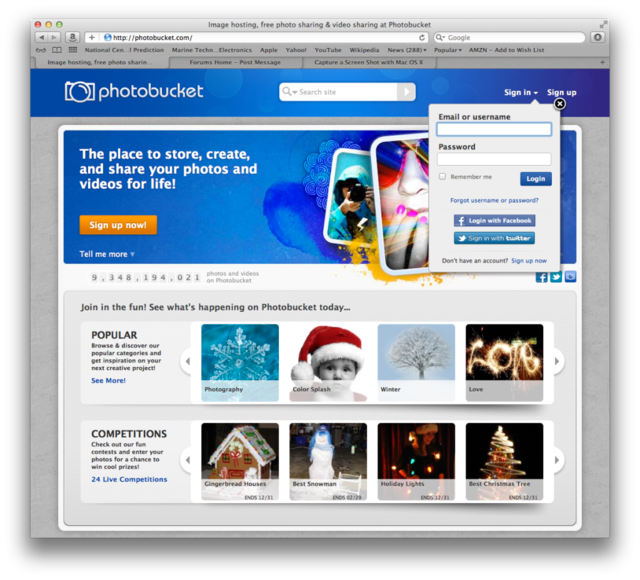
Enter the information you are prompted for.
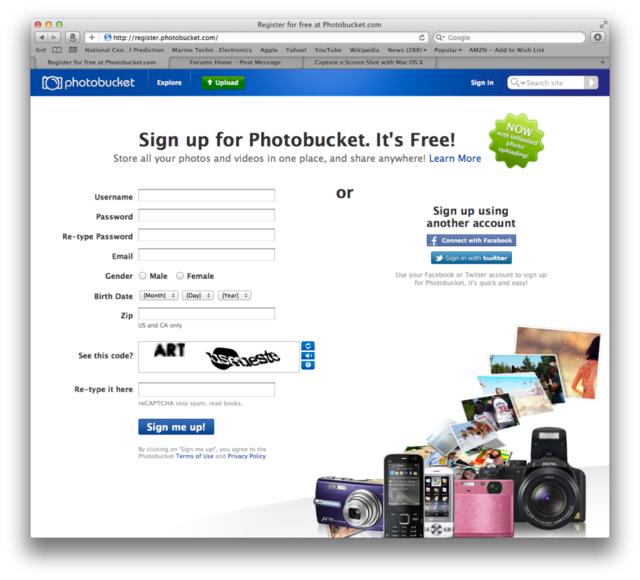
Now that you have your account setup, log in with your Photobucket user name and password.
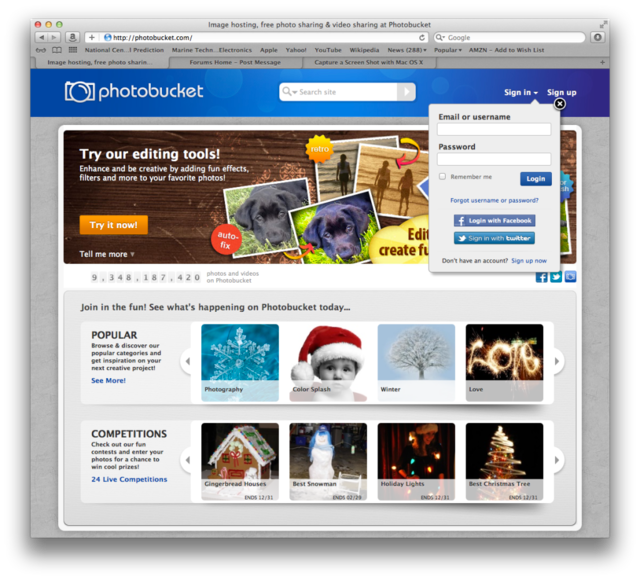
Create albums to organize your photos
By default, all your uploaded pics will go into an album with your username. However, you can create new albums / folders which can help to organize your pictures to make it easier to find them in the future. One important thing to note - if you move photos from one folder on Photobucket to another, any links to these photos which you have used in a forum posting will be broken and you'll have to go back and edit the post with the new / updated link.
When you create a new album you can set various settings - such as the album name, if you want this album to be contained as a part of another existing album (i.e. a nested album), and if you wish the album to be public, private, or password protected. Note that if you wish to share photos then the album in which you wish to share those photos has to be set as Public. One thing to note with the album names - avoid spaces - it seems to throw some browsers for a loop and as a result it won't display the images when linked.
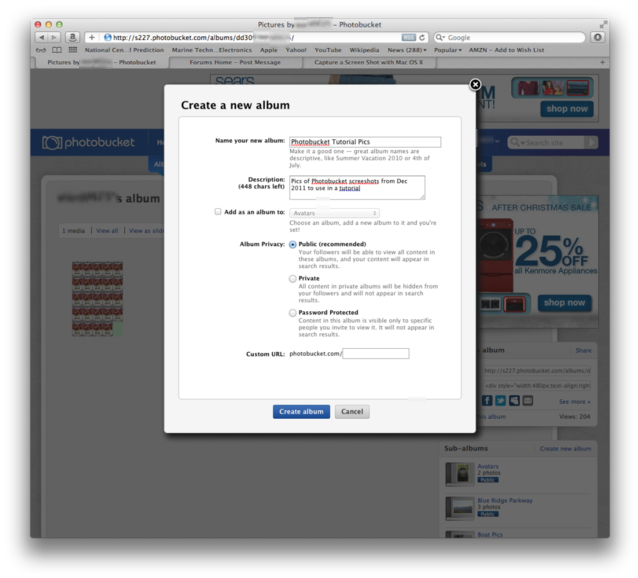
Uploading photos
OK, now have a Photobucket account, we're logged in, we've setup an album or two (which is optional) - now it is time to upload some photos. At the top of the browser window, in the blue Photobucket "menu" bar, is a green Upload button.
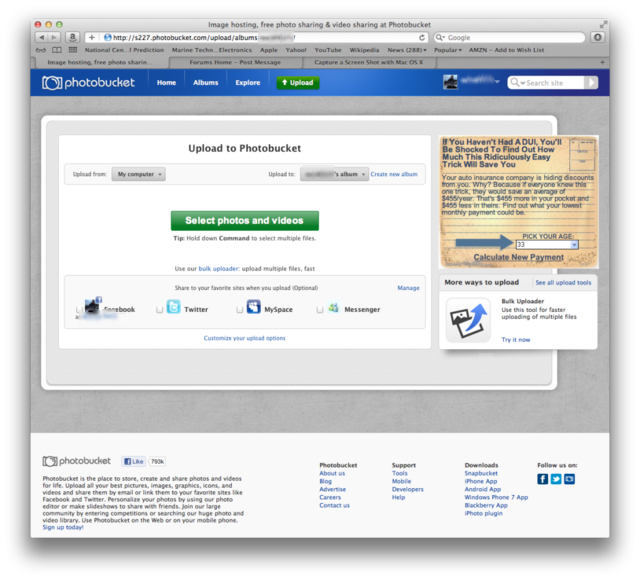
Click on that button and you will see the following screen.
<image to come later>
There are several options on this screen. One is the source from which you wish to upload photos. Generally you will be doing this from "My computer", but you may also want to use the "Bulk Uploader" option if you have a number of photos you want to upload all at once. The other option of importance is where you want the photos to go - on the upper right is an "Upload to:" and then a button that will by default list your Photobucket default album name (usually your Photobucket account name). If you click this you will see a list of all albums which you have created. Pick the album you wish to upload to, and then click on the green "Select Photos & Videos" button.
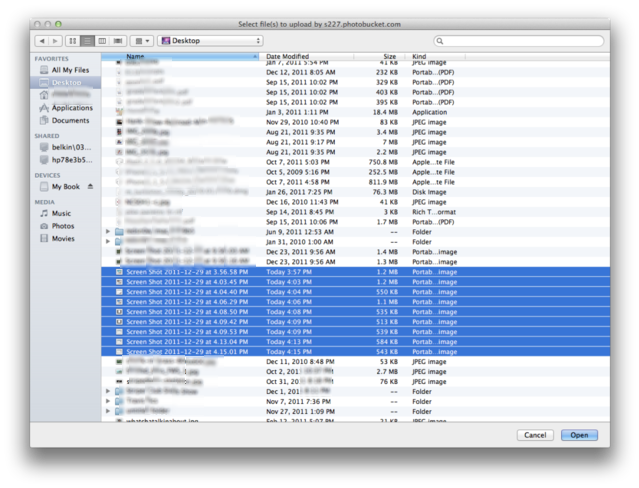
This is where things may differ a bit, but you should now have a window open where you can navigate through your PC's files and select the file (or files) you wish to upload. If all the files you want to upload are in one directory then you can select these multiple files - but if they are scattered in multiple directories on your computer then you may want to use the "Bulk Uploader" option.
Editing Photos
Now that we have some photos uploaded, we can optionally edit them in various ways. One thing that I highly recommend is that you edit the image size. I generally edit my images to the 640x480 resolution so that they take less storage space on Photobucket and more importantly do not take so long to download for you and others when viewing your posts. While message boards like those hosted by ProBoards automatically resize your displayed images, they only do this AFTER downloading your whole image - and if you upload a 5, 7 or 12 megapixel image straight to Photobucket these can be some VERY large images to download later.
To edit your images, click on the image of choice, which will load just that one image. When you place your mouse over the image you will see a menu overlay on the image with various options.
<image to come later>
These are "short-cuts" to things like:
Resize
<image to come later>
Rotate
<image to come later>
Crop
<image to come later>
You can also just click "Edit" and you will get a more advanced screen with lots of editing options - from this screen you can crop, resize, rotate, apply various effects (like swirlies, blur, etc). Once you are happy with the edits you have made, you can either save these changes to the original file, or you can save the image as a new file in your Photobucket album.
[image]
Link to your pictures
OK - the hard part is now done..... let's put some pictures into our posts....
Go to the album that has the picture you want to post, and then "hover" your mouse over the picture thumbnail. You will see a menu pop up with various links. Click on the text that is to the right of the "IMG Code" - that link will briefly change the text to "Copied" and the color to yellow, and the return to the link text. At this point the information needed to paste into your Forum post has now been placed in your Copy/Paste buffer.
<image to come later>
Go to your forum post, and do a "Paste" into your post text. You can use the Brower's many - usually Edit->Paste or use the keyboard shortcuts for your Operating Systems (Ctrl-V for Windows, Command-V for the Mac).
<image to come later>
You'll have the image link with the IMG tags (in brackets) in front and after the link. Click the "Preview" button below your post text entry box to make sure everything comes up and looks like you wanted - if not, edit the text. When you are happy with it, click "Post Message"
<image to come later>

Pics are welcome - the more the better...... pics make a board more interesting and help us all feel like we are there with you.
If possible, save your pics in something like 640x480 or maybe just a little larger - this makes the pics load quicker for everyone, and saves your bandwidth and storage quota on Photobucket or wherever.
(I found the other place where I had posted this tutorial, so here it is
 , I need to update & replace some screen shots, so stay-tuned.
Photobucket ( www.photobucket.com ) is a free photo-sharing web-site where you can upload and store your photos on their Web-site and then link to those photos in forums such as smlfishingforums.proboards.com. In addition to providing basic photo storage, you can do some photo editing such as cropping and resizing your images as well as other editing options (swirles, applying color filters, etc).
This tutorial was written from the perspective of using a Mac and the Safari Web-browser, but the procedure should look and be very similar if not exactly the same when working from a PC using Internet Explorer or another PC-based browser.
You start the fun by going to the Photobucket web-site ( www.photobucket.com ).
Creating a Photobucket account
If you do not already have an account on Photobucket, then you need one - click on "Sign up" in the upper right corner of the browser window.

Enter the information you are prompted for.

Now that you have your account setup, log in with your Photobucket user name and password.

Create albums to organize your photos
By default, all your uploaded pics will go into an album with your username. However, you can create new albums / folders which can help to organize your pictures to make it easier to find them in the future. One important thing to note - if you move photos from one folder on Photobucket to another, any links to these photos which you have used in a forum posting will be broken and you'll have to go back and edit the post with the new / updated link.
When you create a new album you can set various settings - such as the album name, if you want this album to be contained as a part of another existing album (i.e. a nested album), and if you wish the album to be public, private, or password protected. Note that if you wish to share photos then the album in which you wish to share those photos has to be set as Public. One thing to note with the album names - avoid spaces - it seems to throw some browsers for a loop and as a result it won't display the images when linked.

Uploading photos
OK, now have a Photobucket account, we're logged in, we've setup an album or two (which is optional) - now it is time to upload some photos. At the top of the browser window, in the blue Photobucket "menu" bar, is a green Upload button.

Click on that button and you will see the following screen.
<image to come later>
There are several options on this screen. One is the source from which you wish to upload photos. Generally you will be doing this from "My computer", but you may also want to use the "Bulk Uploader" option if you have a number of photos you want to upload all at once. The other option of importance is where you want the photos to go - on the upper right is an "Upload to:" and then a button that will by default list your Photobucket default album name (usually your Photobucket account name). If you click this you will see a list of all albums which you have created. Pick the album you wish to upload to, and then click on the green "Select Photos & Videos" button.
This is where things may differ a bit, but you should now have a window open where you can navigate through your PC's files and select the file (or files) you wish to upload. If all the files you want to upload are in one directory then you can select these multiple files - but if they are scattered in multiple directories on your computer then you may want to use the "Bulk Uploader" option.

Editing Photos
Now that we have some photos uploaded, we can optionally edit them in various ways. One thing that I highly recommend is that you edit the image size. I generally edit my images to the 640x480 resolution so that they take less storage space on Photobucket and more importantly do not take so long to download for you and others when viewing your posts. While message boards like those hosted by ProBoards automatically resize your displayed images, they only do this AFTER downloading your whole image - and if you upload a 5, 7 or 12 megapixel image straight to Photobucket these can be some VERY large images to download later.
To edit your images, click on the image of choice, which will load just that one image. When you place your mouse over the image you will see a menu overlay on the image with various options.
<image to come later>
These are "short-cuts" to things like:
Resize
<image to come later>
Rotate
<image to come later>
Crop
<image to come later>
You can also just click "Edit" and you will get a more advanced screen with lots of editing options - from this screen you can crop, resize, rotate, apply various effects (like swirlies, blur, etc). Once you are happy with the edits you have made, you can either save these changes to the original file, or you can save the image as a new file in your Photobucket album.
[image]
Link to your pictures
OK - the hard part is now done..... let's put some pictures into our posts....
Go to the album that has the picture you want to post, and then "hover" your mouse over the picture thumbnail. You will see a menu pop up with various links. Click on the text that is to the right of the "IMG Code" - that link will briefly change the text to "Copied" and the color to yellow, and the return to the link text. At this point the information needed to paste into your Forum post has now been placed in your Copy/Paste buffer.
<image to come later>
Go to your forum post, and do a "Paste" into your post text. You can use the Brower's many - usually Edit->Paste or use the keyboard shortcuts for your Operating Systems (Ctrl-V for Windows, Command-V for the Mac).
<image to come later>
You'll have the image link with the IMG tags (in brackets) in front and after the link. Click the "Preview" button below your post text entry box to make sure everything comes up and looks like you wanted - if not, edit the text. When you are happy with it, click "Post Message"
<image to come later>

