Post by mwardncsu on Jul 31, 2012 19:14:21 GMT -5
Here's an article I wrote a while back for the Smith Mountain Striper Club newsletter. This came from a lot of reading, input and experience from many of the guys here, and elsewhere. I figured I'd post a copy of it up here...
Cast Netting 101
Mike Ward
Successful live-bait fishing for striped bass on Smith Mountain Lake starts with netting your own quality bait. While minnows can be purchased from local tackle shops, Virginia law prohibits the sale of live shad and alewifes which generally out-catch minnows hands down. But with a little knowledge and a bit of work you can net all the bait you might need to catch (and release) your next citation. This article will cover the basics of selecting a cast net to net bait on Smith Mountain Lake as well a provide some tips & tricks for throwing the net and keeping it in the best shape possible.
So Many Choices....
There are three main attributes that you much decide upon when selecting a cast net that is right for your use: net size; mesh size; weight. The bait that you are targeting and the conditions in which you are attempting to net your bait are the primary factors that play into selecting a net - although secondary factors such as physical ability also play a key role.
Net Size - Cast nets are measured by their radius. As such, an “eight foot” net measures eight feet from the horn of the net (the center where the brail lines come up and through the net) down to the lead line, and will cover a 16’ diameter circle when fully extended or a little more than 200 square feet of surface area. The size of the net is important as the larger the net, the larger the amount of water that you can cover in one throw, increasing the amount of bait which you can potentially net in a single toss. As the net size increases, the area of water covered increases dramatically. A six foot net covers only 113 square feet - about 45% less area than the eight foot net. On the other hand a ten foot net has well over 300 square feet of surface area and greater than 50% more than the eight foot net, and a twelve foot net covers a whopping 452 square feet, or well over two times the area of the eight foot net.
Mesh Size - the mesh size is the dimension of one side of the square formed by the net mesh. A 3/8” mesh would have squares 3/8” x 3/8”. Sometimes manufactures refer to the “stretch” length or size, which is essentially the the length if you were to stretch the square opposite corner to corner. This is nothing more than the length of 2 sides, so a 1/2” mesh would have a “stretch” length of 1”. Selecting the mesh size for your net has to do with determining the size of the bait that you are targeting. If the mesh size is too large, smaller bait will be able to escape through the net’s mesh. The smaller the mesh size, the more material there is to slow the net’s fall through the water, and thus all things being equal, a net with a smaller mesh size will sink slower than a net with a larger mesh size, and this can result in missed bait in deeper water. In general, smaller mesh nets are also more expensive due to the additional mono-filament required to weave the netting.
Weight - the final primary selection criteria is the amount of weight added to the net to assist it in sinking. Generally nets will range from 0.5 lb/ft to around 1.5 lbs/ft. Again, it is important to understand how to translate this specification to how much weight you will be lofting through the air. The “ft” component refers to the radius of the net. Therefore, an eight foot net with 0.5 lb/ft weight will weigh approximately 4 lbs, where a 10’ net with 1.5 lb/ft will weigh in at a hefty 15 lbs. Selection of the right net weight will come down to factors such as the depth you expect to be netting your bait in (heavier weights will cause the net to sink faster, getting to those fast moving baits before they can swim out from under the net), but the fatigue factor that results from tossing a heavy net time after time must also be taken into consideration.
Other Attributes - there are attributes which differentiate one net from another - such as the length of the hand line, the size or “test” of the mono-filiment used to construct the mesh netting and the brail lines, etc. However, the three attributes above are the primary selection factors when choosing a net.
OK.... So which one do I need???
Now that we’ve covered the basic attributes that differentiate the nets on a store shelf, how do you take that information and apply it to select the right net for your needs. Starting with mesh size, the conventional wisdom by many at Smith Mountain is that a 3/8” mesh net is ideal for catching smaller bait like alewifes or smaller gizzard shad, while a 5/8” mesh (or perhaps a 3/4” mesh) is ideal for catching larger gizzards shad 6” and up. The benefit of the 3/8” mesh is that it will net smaller bait while generally not gilling too many baits (some use a 1/4” mesh to further remove the liklihood of gilling baits), but the drawback is that it will have a slower sink rate in deeper water, making it hard to net the larger, and thus faster gizzard shad and large alewifes.
I generally subscribe to the Tim Allen, “More power - bigger is better” school, and when chasing larger gizzard shad that are not well schooled up in the early fall, I do not think there is a net big enough to help minimize the number of throws that are required. However, the larger the net the more cumbersome it is to throw, as well as the heavier it becomes which rapidly increases shoulder and arm fatigue - so again, there is a balance to strike here. Most can sufficiently cast an eight foot net, whereas a ten foot or larger can become problematic both from the overall size/length of the net as well as the weigth. In addition, when casting into densely populated schools of bait, a larger net will catch many more bait and catching too many baits at one time can be harmful to the bait, knock many scales of the baits as they thrash together in the net and reduce their likelihood of survival in your tank. Thus, when casting into large, dense schools of bait, you may wish to select a smaller diameter net to minimize the amount caught in one throw.
In an ideal world you would have two, three or more nets each tailored for specific situations. However, with the cost of many quality nets running well over a hundred dollars each, and all the net-hungry timber that we have in Smith Mountain Lake, this is not practical for most people. As such, decide what type of bait you fish and where you catch them most frequently and choose a net for that purpose. Another alternative would be to go with a “tween” net - I have successfully been using an eight foot, 1/2” mesh, 1.5 lb/ft net for some time to catch both alewives and gizzard shad and have found the 1/2” mesh to perhaps sink a bit faster than a 3/8” allowing me to net larger alewives than I do when I cast a 3/8” mesh net of equal size & weight. I will cast a word of advise to consider dedicating a few extra dollars to the purchase of a quality net. The “cheap” nets you often find in the big-box stores will generally not have as much weigh per foot and are often made of a type of net construction which do not allow them to open as easily, further reducing your coverage area. When considering all the time that you will spend in the act of catching your own bait, a few extra dollars spent up front on a quality net will catch more bait, in less throws and get you out fishing faster.
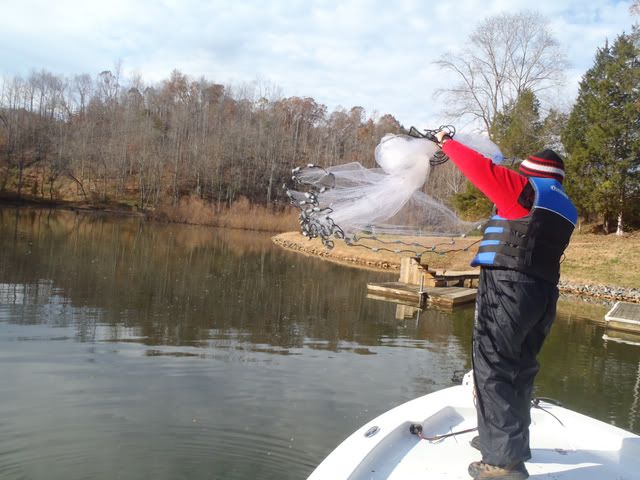
Casting the Net
Now that you’ve made a selection on the “right” net for you, it is time to begin to learn to throw the net to successfully capture your bait. There are many techniques employed by fishermen to toss a cast net, some which appear to range from effortless to ones that rival Olympic hammer throw athletes. What is the best technique for tossing a cast net? In my experience it has been the one employed by my buddy that is fishing with me that day, while I watch and provide moral support. Seriously, certain techniques seem to lend themselves to throwing larger nets better than smaller nets, or lighter nets better than heavier nets. As such, I recommend that you explore a variety of techniques, spend some time watching some various videos on-line and then get out into the yard and toss and toss and toss that net some more until you are able to repeatedly get the net to open like a pancake, vs a taco or some other tangled, jumbled mess. To help you with this process we’ve included links to a number of cast net technique videos on YouTube that you can watch.
Other Tips & Techniques
Now that we’ve covered the basics of selecting a cast net and how to throw it to catch your bait, we’ll wrap up with a few related tips and techniques.
Fabric Softener - when you first purchase your net, and every so often after using it, soak your net in a bucket with hot water and a cup or two of fabric softener. This will soften the mono-filament making it more supple and easier to throw and it also has the added benefit of providing that “Spring Fresh” smell to your net for a while, which after being covered in shad slime time and time again will be a welcome treat.
Know where you are throwing - as has been said above, Smith Mountain Lake’s beauty is only exceeded by the amount of timber which lies beneath its surface. It is always a good idea to make a pass or two over your intended throw-zone with your fish finder to confirm that you have a snag-free target to work with.
Let it sink - When tossing the net, it is best to let the net sink fully to the bottom before beginning the retrieve. If needed, tie an extra length of rope onto the hand line - just make sure you use a very sturdy knot - or have a grapple hook and rope at the ready to try and recover your net.
Grab the net by the horn - it is a matter of when - not if - you will ensnarl your net on some submerged timber. When this happens try to get the horn of the net (the round ring at the top/center of the net where there brail lines come up through) and then pull straight up on the net by the horn. Often this, and a little wiggling will free the net from your snag and do little to no damage to the net’s mesh. Should you have a more involved snag or more force is required to free the net which results in a tear or two, 15 lb braided fishing line makes a good material to stitch those holes closed and get you back in service. If all hope is lost, tie as much of the net and lead line as you can off to the cleat of your boat and drive away - then cut the leads free of your mass of mono and give them to a friend that will pour you some fresh jig heads to use after you give up live-bait fishing for the last time (again).
Give it a shake - when you gill some bait, many times they will come out if you give a quick vigorous shake to the net right near the gilled bait. With a little practice you can quickly clear a net with numerous gilled baits without having to pull them out with your hands
Clean and store your net - after netting your bait, rinse it well to get any shad slime or lake muck off the net, then allow it to dry and store out of the sun. Never leave your net out in the sunlight for extended periods of time as the Sun’s UV rays will being to break down the mono and make your net hard to throw and brittle
After a little practice, netting your own bait can prove just as rewarding, if not more, as actually landing that prized striper. Enjoy!
Casting Technique Videos:
Cast Netting 101
Mike Ward
Successful live-bait fishing for striped bass on Smith Mountain Lake starts with netting your own quality bait. While minnows can be purchased from local tackle shops, Virginia law prohibits the sale of live shad and alewifes which generally out-catch minnows hands down. But with a little knowledge and a bit of work you can net all the bait you might need to catch (and release) your next citation. This article will cover the basics of selecting a cast net to net bait on Smith Mountain Lake as well a provide some tips & tricks for throwing the net and keeping it in the best shape possible.
So Many Choices....
There are three main attributes that you much decide upon when selecting a cast net that is right for your use: net size; mesh size; weight. The bait that you are targeting and the conditions in which you are attempting to net your bait are the primary factors that play into selecting a net - although secondary factors such as physical ability also play a key role.
Net Size - Cast nets are measured by their radius. As such, an “eight foot” net measures eight feet from the horn of the net (the center where the brail lines come up and through the net) down to the lead line, and will cover a 16’ diameter circle when fully extended or a little more than 200 square feet of surface area. The size of the net is important as the larger the net, the larger the amount of water that you can cover in one throw, increasing the amount of bait which you can potentially net in a single toss. As the net size increases, the area of water covered increases dramatically. A six foot net covers only 113 square feet - about 45% less area than the eight foot net. On the other hand a ten foot net has well over 300 square feet of surface area and greater than 50% more than the eight foot net, and a twelve foot net covers a whopping 452 square feet, or well over two times the area of the eight foot net.
Mesh Size - the mesh size is the dimension of one side of the square formed by the net mesh. A 3/8” mesh would have squares 3/8” x 3/8”. Sometimes manufactures refer to the “stretch” length or size, which is essentially the the length if you were to stretch the square opposite corner to corner. This is nothing more than the length of 2 sides, so a 1/2” mesh would have a “stretch” length of 1”. Selecting the mesh size for your net has to do with determining the size of the bait that you are targeting. If the mesh size is too large, smaller bait will be able to escape through the net’s mesh. The smaller the mesh size, the more material there is to slow the net’s fall through the water, and thus all things being equal, a net with a smaller mesh size will sink slower than a net with a larger mesh size, and this can result in missed bait in deeper water. In general, smaller mesh nets are also more expensive due to the additional mono-filament required to weave the netting.
Weight - the final primary selection criteria is the amount of weight added to the net to assist it in sinking. Generally nets will range from 0.5 lb/ft to around 1.5 lbs/ft. Again, it is important to understand how to translate this specification to how much weight you will be lofting through the air. The “ft” component refers to the radius of the net. Therefore, an eight foot net with 0.5 lb/ft weight will weigh approximately 4 lbs, where a 10’ net with 1.5 lb/ft will weigh in at a hefty 15 lbs. Selection of the right net weight will come down to factors such as the depth you expect to be netting your bait in (heavier weights will cause the net to sink faster, getting to those fast moving baits before they can swim out from under the net), but the fatigue factor that results from tossing a heavy net time after time must also be taken into consideration.
Other Attributes - there are attributes which differentiate one net from another - such as the length of the hand line, the size or “test” of the mono-filiment used to construct the mesh netting and the brail lines, etc. However, the three attributes above are the primary selection factors when choosing a net.
OK.... So which one do I need???
Now that we’ve covered the basic attributes that differentiate the nets on a store shelf, how do you take that information and apply it to select the right net for your needs. Starting with mesh size, the conventional wisdom by many at Smith Mountain is that a 3/8” mesh net is ideal for catching smaller bait like alewifes or smaller gizzard shad, while a 5/8” mesh (or perhaps a 3/4” mesh) is ideal for catching larger gizzards shad 6” and up. The benefit of the 3/8” mesh is that it will net smaller bait while generally not gilling too many baits (some use a 1/4” mesh to further remove the liklihood of gilling baits), but the drawback is that it will have a slower sink rate in deeper water, making it hard to net the larger, and thus faster gizzard shad and large alewifes.
I generally subscribe to the Tim Allen, “More power - bigger is better” school, and when chasing larger gizzard shad that are not well schooled up in the early fall, I do not think there is a net big enough to help minimize the number of throws that are required. However, the larger the net the more cumbersome it is to throw, as well as the heavier it becomes which rapidly increases shoulder and arm fatigue - so again, there is a balance to strike here. Most can sufficiently cast an eight foot net, whereas a ten foot or larger can become problematic both from the overall size/length of the net as well as the weigth. In addition, when casting into densely populated schools of bait, a larger net will catch many more bait and catching too many baits at one time can be harmful to the bait, knock many scales of the baits as they thrash together in the net and reduce their likelihood of survival in your tank. Thus, when casting into large, dense schools of bait, you may wish to select a smaller diameter net to minimize the amount caught in one throw.
In an ideal world you would have two, three or more nets each tailored for specific situations. However, with the cost of many quality nets running well over a hundred dollars each, and all the net-hungry timber that we have in Smith Mountain Lake, this is not practical for most people. As such, decide what type of bait you fish and where you catch them most frequently and choose a net for that purpose. Another alternative would be to go with a “tween” net - I have successfully been using an eight foot, 1/2” mesh, 1.5 lb/ft net for some time to catch both alewives and gizzard shad and have found the 1/2” mesh to perhaps sink a bit faster than a 3/8” allowing me to net larger alewives than I do when I cast a 3/8” mesh net of equal size & weight. I will cast a word of advise to consider dedicating a few extra dollars to the purchase of a quality net. The “cheap” nets you often find in the big-box stores will generally not have as much weigh per foot and are often made of a type of net construction which do not allow them to open as easily, further reducing your coverage area. When considering all the time that you will spend in the act of catching your own bait, a few extra dollars spent up front on a quality net will catch more bait, in less throws and get you out fishing faster.
Casting the Net
Now that you’ve made a selection on the “right” net for you, it is time to begin to learn to throw the net to successfully capture your bait. There are many techniques employed by fishermen to toss a cast net, some which appear to range from effortless to ones that rival Olympic hammer throw athletes. What is the best technique for tossing a cast net? In my experience it has been the one employed by my buddy that is fishing with me that day, while I watch and provide moral support. Seriously, certain techniques seem to lend themselves to throwing larger nets better than smaller nets, or lighter nets better than heavier nets. As such, I recommend that you explore a variety of techniques, spend some time watching some various videos on-line and then get out into the yard and toss and toss and toss that net some more until you are able to repeatedly get the net to open like a pancake, vs a taco or some other tangled, jumbled mess. To help you with this process we’ve included links to a number of cast net technique videos on YouTube that you can watch.
Other Tips & Techniques
Now that we’ve covered the basics of selecting a cast net and how to throw it to catch your bait, we’ll wrap up with a few related tips and techniques.
Fabric Softener - when you first purchase your net, and every so often after using it, soak your net in a bucket with hot water and a cup or two of fabric softener. This will soften the mono-filament making it more supple and easier to throw and it also has the added benefit of providing that “Spring Fresh” smell to your net for a while, which after being covered in shad slime time and time again will be a welcome treat.
Know where you are throwing - as has been said above, Smith Mountain Lake’s beauty is only exceeded by the amount of timber which lies beneath its surface. It is always a good idea to make a pass or two over your intended throw-zone with your fish finder to confirm that you have a snag-free target to work with.
Let it sink - When tossing the net, it is best to let the net sink fully to the bottom before beginning the retrieve. If needed, tie an extra length of rope onto the hand line - just make sure you use a very sturdy knot - or have a grapple hook and rope at the ready to try and recover your net.
Grab the net by the horn - it is a matter of when - not if - you will ensnarl your net on some submerged timber. When this happens try to get the horn of the net (the round ring at the top/center of the net where there brail lines come up through) and then pull straight up on the net by the horn. Often this, and a little wiggling will free the net from your snag and do little to no damage to the net’s mesh. Should you have a more involved snag or more force is required to free the net which results in a tear or two, 15 lb braided fishing line makes a good material to stitch those holes closed and get you back in service. If all hope is lost, tie as much of the net and lead line as you can off to the cleat of your boat and drive away - then cut the leads free of your mass of mono and give them to a friend that will pour you some fresh jig heads to use after you give up live-bait fishing for the last time (again).
Give it a shake - when you gill some bait, many times they will come out if you give a quick vigorous shake to the net right near the gilled bait. With a little practice you can quickly clear a net with numerous gilled baits without having to pull them out with your hands
Clean and store your net - after netting your bait, rinse it well to get any shad slime or lake muck off the net, then allow it to dry and store out of the sun. Never leave your net out in the sunlight for extended periods of time as the Sun’s UV rays will being to break down the mono and make your net hard to throw and brittle
After a little practice, netting your own bait can prove just as rewarding, if not more, as actually landing that prized striper. Enjoy!
Casting Technique Videos: